Difference between revisions of "General/Jupyternotebook"
m |
m |
||
| Line 8: | Line 8: | ||
Jupyter notebooks are ideally suited for ''educational purposes only'', however they have limitations across a network particularly with the graphical interface. The university does provide a jupyter notebook service - [https://jupyterhub.hull.ac.uk https://jupyterhub.hull.ac.uk]. | Jupyter notebooks are ideally suited for ''educational purposes only'', however they have limitations across a network particularly with the graphical interface. The university does provide a jupyter notebook service - [https://jupyterhub.hull.ac.uk https://jupyterhub.hull.ac.uk]. | ||
| − | * '''Important''' : If you wish to carry out serious python development consider changing to an [[General/Interactive|interactive session]] and using a [[Applications/Miniconda|virtual environment]] within your account. If you wish to edit files on your local machine there are many IDEs which provide a means for transferring python file across to Viper seamlessly, examples of these are [https://www.jetbrains.com/pycharm/ | + | * '''Important''' : If you wish to carry out serious python development consider changing to an [[General/Interactive|interactive session]] and using a [[Applications/Miniconda|virtual environment]] within your account. If you wish to edit files on your local machine there are many IDEs which provide a means for transferring python file across to Viper seamlessly, examples of these are [https://www.jetbrains.com/pycharm/ PyCharm] and [https://code.visualstudio.com/ Visual Code]. (''All suitable for Linux, MacOS and Windows''). |
==Setting up== | ==Setting up== | ||
Revision as of 11:05, 6 February 2020
Contents
Introduction
The Jupyter Notebook is an interactive computing environment that enables users to author notebook documents that include: - Live code - Interactive widgets - Plots - Narrative text - Equations - Images - Video.
Jupyter notebooks are ideally suited for educational purposes only, however they have limitations across a network particularly with the graphical interface. The university does provide a jupyter notebook service - https://jupyterhub.hull.ac.uk.
- Important : If you wish to carry out serious python development consider changing to an interactive session and using a virtual environment within your account. If you wish to edit files on your local machine there are many IDEs which provide a means for transferring python file across to Viper seamlessly, examples of these are PyCharm and Visual Code. (All suitable for Linux, MacOS and Windows).
Setting up
Interactive mode (GPU)
Below is the console output of using jupyter notebook in an interactive session
[pysdlb@login01 ~]$ interactive -pgpu
salloc: Granted job allocation 2216487
Job ID 2216487 connecting to gpu03, please wait...
Last login: Tue Jan 14 12:01:33 2020 from login01
[pysdlb@gpu03 ~]$ module load python/anaconda/4.6/miniconda/3.7
[pysdlb@gpu03 ~]$ conda create -n jupyter

Collecting package metadata (current_repodata.json): done
Solving environment: done

## Package Plan ##

  environment location: /home/pysdlb/.conda/envs/jupyter


Proceed ([y]/n)? y

Preparing transaction: done
Verifying transaction: done
Executing transaction: done
#
# To activate this environment, use
#
#     $ conda activate jupyter
#
# To deactivate an active environment, use
#
#     $ conda deactivate

[pysdlb@gpu03 ~]$ conda activate jupyter
(jupyter) [pysdlb@gpu03 ~]$ conda install -c anaconda jupyter
Collecting package metadata (current_repodata.json): done
Solving environment: done
......
Preparing transaction: done
Verifying transaction: done
Executing transaction: done
(jupyter) [pysdlb@gpu03 ~]$ conda install -c fastai fastai
Collecting package metadata (current_repodata.json): done
Solving environment: -
.....
Preparing transaction: done
Verifying transaction: done
Executing transaction: done
(jupyter) [pysdlb@gpu03 ~]$ conda install -c conda-forge nibabel
Collecting package metadata (current_repodata.json): done
Solving environment: done
.....
Preparing transaction: done
Verifying transaction: done
Executing transaction: done
(jupyter) [pysdlb@gpu03 ~]$ jupyter notebook
[I 13:33:59.573 NotebookApp] The port 8888 is already in use, trying another port.
[I 13:33:59.715 NotebookApp] Serving notebooks from local directory: /home/pysdlb
[I 13:33:59.715 NotebookApp] The Jupyter Notebook is running at:
[I 13:33:59.715 NotebookApp] http://localhost:8889/?token=50b345a31008ba2913678140c6aa4f85d0217bce6b1f83e5
[I 13:33:59.715 NotebookApp]  or http://127.0.0.1:8889/?token=50b345a31008ba2913678140c6aa4f85d0217bce6b1f83e5
[I 13:33:59.715 NotebookApp] Use Control-C to stop this server and shut down all kernels (twice to skip confirmation).
[C 13:34:01.967 NotebookApp]

    To access the notebook, open this file in a browser:
        file:///home/pysdlb/.local/share/jupyter/runtime/nbserver-10504-open.html
    Or copy and paste one of these URLs:
        http://localhost:8889/?token=50b345a31008ba2913678140c6aa4f85d0217bce6b1f83e5
     or http://127.0.0.1:8889/?token=50b345a31008ba2913678140c6aa4f85d0217bce6b1f83e5
START /usr/bin/firefox "/home/pysdlb/.local/share/jupyter/runtime/nbserver-10504-open.html"
- Prepare SLURM batch script for jupyter notebook backend
CPU based
#!/bin/sh
#SBATCH -p compute
#SBATCH --ntasks=1
#SBATCH -t 04:00:00             # max runtime is 4 hours
#SBATCH -J ipy_server    # name
#SBATCH -o QQQ.out

let ipnport=($UID-6025)%65274
echo ipnport=$ipnport

ipnip=$(hostname -i)
echo ipnip=$ipnip

module purge
module load python/anaconda/4.6/miniconda/3.7

# Use virtual environment for python customization (change <user>)

source activate /home/user/.conda/envs/jupyter

export I_MPI_DEBUG=5
export I_MPI_FABRICS=shm:tmi
export I_MPI_FALLBACK=no

unset XDG_RUNTIME_DIR
jupyter notebook --ip=$ipnip --port=$ipnport --no-browser
This generates an output file with the URL required to connect to the jupyter notebook backend
ipnport=1487
ipnip=10.254.5.93
[I 09:53:13.302 NotebookApp] Serving notebooks from local directory: /home/pysdlb
[I 09:53:13.302 NotebookApp] 0 active kernels
[I 09:53:13.303 NotebookApp] The Jupyter Notebook is running at:
[I 09:53:13.303 NotebookApp] http://10.254.5.93:1487/?token=b71e38e053bd44e62ba340aff5a5b9b68c74cd0d0883d582
[I 09:53:13.303 NotebookApp] Use Control-C to stop this server and shut down all kernels (twice to skip confirmation).
[C 09:53:13.345 NotebookApp]

    Copy/paste this URL into your browser when you connect for the first time,
    to login with a token:
        http://10.254.5.93:1487/?token=b71e38e053bd44e62ba340aff5a5b9b68c74cd0d0883d582
[I 09:55:58.597 NotebookApp] 302 GET /?token=b71e38e053bd44e62ba340aff5a5b9b68c74cd0d0883d582 (10.254.5.247) 3.56ms
- Going to a browser on visualisation nodes or at time of writing login02.hpc.hull.ac.uk
$ firefox http://10.254.5.93:1487/?token=b71e38e053bd44e62ba340aff5a5b9b68c74cd0d0883d582
- It should be possible to combine these two steps into one script
GPU Configuration
- the SLURM batch script would slightly different
#!/bin/sh
#SBATCH --ntasks=1
#SBATCH -t 04:00:00             # max runtime is 4 hours
#SBATCH -J ipy_server    # name
#SBATCH -o QQQ.out
#SBATCH --gres=gpu          # use the GPU resource not the CPU
#SBATCH -p gpu              # Slurm partition, where you want the job to be queued

let ipnport=($UID-6025)%65274
echo ipnport=$ipnport

ipnip=$(hostname -i)
echo ipnip=$ipnip

module purge
module load python/anaconda/4.6/miniconda/3.7

# Use virtual environment for python customization (change <user>)

source activate /home/user/.conda/envs/jupyter

export I_MPI_DEBUG=5
export I_MPI_FABRICS=shm:tmi
export I_MPI_FALLBACK=no

unset XDG_RUNTIME_DIR
jupyter notebook --ip=$ipnip --port=$ipnport --no-browser
- Get Python to detect GPU Correctly (within Tensorflow here)
sess = tf.Session(config=tf.ConfigProto(log_device_placement=True))
SSH Tunneling for Jupyter
It is possible to run Jupyter on a compute node and connect to the notebook from your desktop browser. In order to do this you need to 'tunnel' a connection from your desktop/laptop over SSH to the node that Jupyter is running on.
SSH Tunneling with MobaXterm
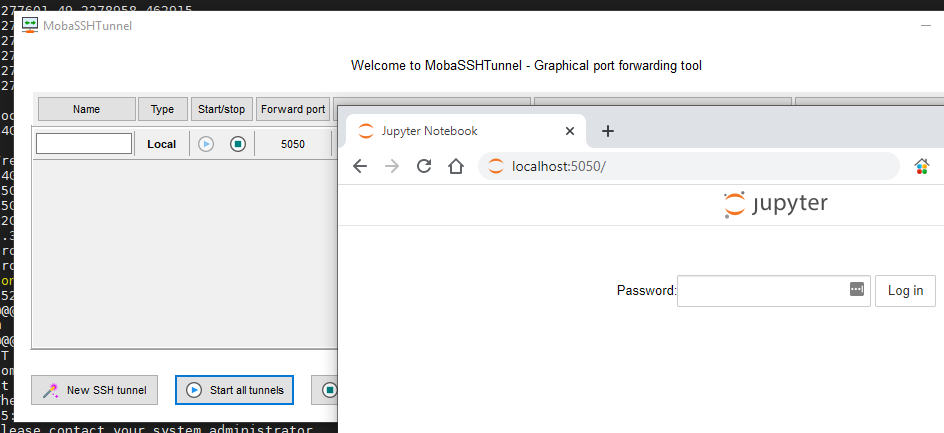
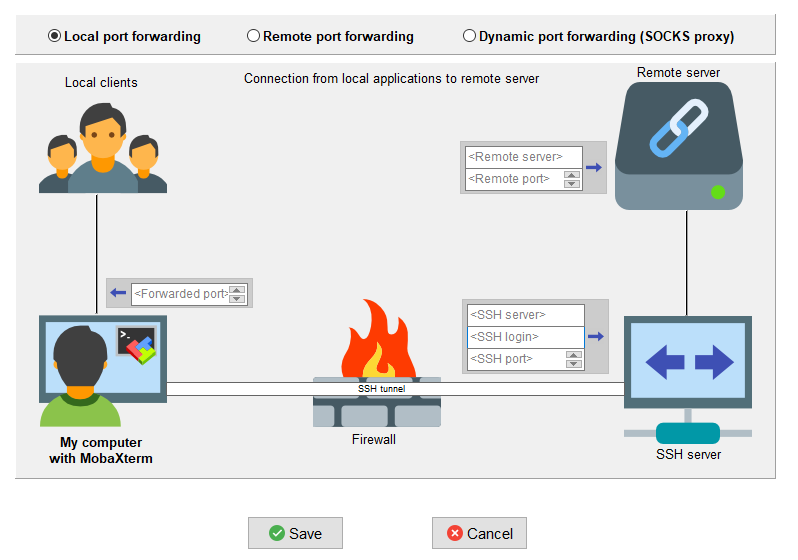
In MobaXterm tunnels are set up independently to an SSH connection. To set up a tunnel, open the Tunneling menu by either going to Tools > MobaSSHTunnel (port forwarding) from the top menu or Tunneling from the button bar. In the new MobaSSHTunnel window you can start an existing tunnel or add new tunnels, click New SSH Tunnnel. In the next window you want to set/select:
- Local port forwarding
- Under "Local clients" enter the port that you will point your local web browser to in "<Forwarded port>" for example 5050 (it doesn't have to be the same as the port your Jupyter notebook is running on on Viper, but it is easier if it is)
- In "SSH server" enter "viper.hull.ac.uk" for SSH server and your username for "SSH login"
- In "Remote server", under "<Remote server>" put the name of the compute node the Jupyter notebook is running on for example c048 (identify from squeue) and under "<Remote port>" enter the port your notebook is using, e.g. 5050 (either set manually or via your Jupyter config file).
- Save
Once the tunnel is started you can point your local web browser to localhost:5050

SSH Tunneling on Linux and Mac
To setup a port forwarding tunnel on Linux or Mac, simply run the following SSH command (replacing 5050 with your chosen port and c048 with your compute node name):
ssh viper.hull.ac.uk -L 5050:c048:5050
Again, you can then just point your browser to localhost:5050 to connect
Using jupyter configuration file
Jupyter notebook can be run using a configuration file to ease the number of command line option needed.
Defaults for these options can also be set by creating a file named jupyter_notebook_config.py in your Jupyter folder. The Jupyter folder is in your home directory, ~/.jupyter.
To create a jupyter_notebook_config.py file, with all the defaults commented out, you can use the following command line:
$ jupyter notebook --generate-config
Then for example add/modify the following lines to allow connection from any host, set a default port (5050 in this example), tell Jupyter not to try to open a browser, and set a default password.
c.NotebookApp.ip = '*'
c.NotebookApp.port = 5050
c.NotebookApp.open_browser = False
c.NotebookApp.password = u'sha1:a1d634eb9a3c:fa1e22d81b2b456be67d3b59810c335b33c223134'
To get your password you can use the following in python:
In [1]: from notebook.auth import passwd
In [2]: passwd()
Enter password:
Verify password:
Out[2]: 'sha1:a1d634eb9a3c:fa1e22d81b2b456be67d3b59810c335b33c223134'
Resources

