Difference between revisions of "Training/Transferring Data"
m |
(→Linux) |
||
| (75 intermediate revisions by 2 users not shown) | |||
| Line 1: | Line 1: | ||
__TOC__ | __TOC__ | ||
| − | + | ||
| − | + | ||
| − | |style="width: | + | ==Methods== |
| + | |||
| + | ===Small to medium amounts of data=== | ||
| + | |||
| + | This can be carried out using a number of SFTP-styled packages such as sftp, scp, rsync, and Filezilla to name a few. Filezilla can be downloaded as a Windows application and may be more suitable for people who prefer a Windows environment, rather than the command line. | ||
| + | |||
| + | '''Note''' FTP (insecure) is disabled on viper.hull.ac.uk and SFTP (secure FTP) is the recommended method. | ||
| + | |||
| + | ===Large to a huge amount of data (100GB +)=== | ||
| + | To avoid excessive network congestion and the long period to transfer such data please raise a [https://hull.service-now.com/ support ticket] for further details. This may typically involve connecting a USB data drive directly to VIPER to copy the data quickly into your user area. | ||
| + | |||
| + | ===OneDrive to Viper=== | ||
| + | |||
| + | With the University using MS OneDrive, it is possible to copy files to Viper. For multiple files, zip your files up on OneDrive first (considerably easier), as shown here: | ||
| + | |||
| + | {| class="wikitable mw-collapsible" | ||
| + | | style="width:100%; background: #aaaaaa;" | <Strong>From OneDrive to Viper</Strong> | ||
|- | |- | ||
| − | | | + | | |
| + | * Starting with the zipped file MyData.zip on OneDrive, copied previously and compressed from local storage. | ||
| + | * Click on the '''share icon''' or options for the file here (three horizontal dots) and select '''share'''. | ||
| + | |||
| + | [[File:onedrive-01.png]] | ||
| + | |||
| + | * Then | ||
| + | |||
| + | [[File:onedrive-02.png]] | ||
| + | |||
| + | * Click on '''Copy''' | ||
| + | |||
| + | [[File:onedrive-03.png]] | ||
| + | |||
| + | * On your Viper console application, type '''wget''' and paste in the copied link and follow with '''-O yourfilename''' (otherwise Linux will name the file to the OneDrive link - ''argh!'') | ||
| + | |||
| + | [[File:onedrive-04.png]] | ||
| + | |||
| + | * And here is the received file | ||
| − | + | [[File:onedrive-05.png]] | |
| − | |||
| − | + | '''Remember''' to un-share the file on OneDrive and use unzip (if required) on Linux to restore the file structure. | |
| − | + | ||
| + | |} | ||
==Universal== | ==Universal== | ||
The following can only be performed on Windows after installing MobaXterm or PuTTY. | The following can only be performed on Windows after installing MobaXterm or PuTTY. | ||
| − | The example user is user1; you will need to enter your | + | The example user is user1; you will need to enter your username here: |
| − | {| class="wikitable" | + | {| class="wikitable mw-collapsible" |
| − | | style="width:100%" | <Strong> | + | | style="width:100%; background: #aaaaaa;" | <Strong>* To Viper from local computer</Strong> |
|- | |- | ||
| − | |scp myfile user1@ | + | |scp myfile user1@viperlogin.hpc.hull.ac.uk:myfile |
|- | |- | ||
|rsync -av my-directory viper.hull.ac.uk:/data/users/YourID | |rsync -av my-directory viper.hull.ac.uk:/data/users/YourID | ||
|} | |} | ||
| − | {| class="wikitable" | + | |
| − | | style="width:100%" | <Strong>From Viper to your local | + | {| class="wikitable mw-collapsible" |
| + | | style="width:100%; background: #aaaaaa;" | <Strong>* From Viper to your local computer</Strong> | ||
|- | |- | ||
| − | |scp user1@ | + | | scp user1@viperlogin.hpc.hull.ac.uk:bio/YourUCInetID/hpc-file |
|- | |- | ||
|rsync -av viper.hull.ac.uk:/data/users/YourID/mydatadirectory | |rsync -av viper.hull.ac.uk:/data/users/YourID/mydatadirectory | ||
|} | |} | ||
| + | |||
==Windows== | ==Windows== | ||
The following example uses MobaXterm, for transferring large files it is recommended to use FileZilla. For instructions on how to use FileZilla view the Linux section. follow the instruction in the Getting Connected section for installing MobaXterm. | The following example uses MobaXterm, for transferring large files it is recommended to use FileZilla. For instructions on how to use FileZilla view the Linux section. follow the instruction in the Getting Connected section for installing MobaXterm. | ||
| − | |||
| − | |||
| − | |||
| − | |||
| − | + | {| class="wikitable mw-collapsible" | |
| + | | style="width:100%; background: #aaaaaa;" | <Strong>* Uploading Files</Strong> | ||
| + | |- | ||
| + | |* To upload files to Viper, navigate to the directory you wish to upload files to use the MobaXterm file browser. | ||
| + | * Choose the file/files to upload and click open or alternatively drag and drop the file/files you wish to upload over the Viper file browser. | ||
| + | * The upload may take some time depending on upload speed and file size. | ||
| + | |} | ||
| − | == | + | |
| − | + | {| class="wikitable mw-collapsible" | |
| + | | style="width:100%; background: #aaaaaa;" | <Strong>* Downloading Files</Strong> | ||
| + | |- | ||
| + | |* To download files from Viper, navigate to the directory using the MobaXterm file browser. | ||
[[File:mobaxterm_file_browser.jpg]] | [[File:mobaxterm_file_browser.jpg]] | ||
| − | + | * Select the file/files you wish to download and click the 'download selected files button'. | |
[[File:mobaxterm_download_icon.jpg]] | [[File:mobaxterm_download_icon.jpg]] | ||
| − | + | * Choose the directory where you want the files to download and click ok. | |
| + | * The download will start, depending on download speed and file size this may take some time. | ||
| + | |} | ||
| − | + | ==MacOS== | |
| + | The following example uses Cyberduck, you can download Cyberduck from https://cyberduck.io macOS also supports FileZilla for an example of how to use FileZilla please view the Linux section. | ||
| − | == | + | {| class="wikitable mw-collapsible" |
| − | + | | style="width:100%; background: #aaaaaa;" | <Strong>Connecting</Strong> | |
| − | + | |- | |
| − | + | | | |
| + | * Click Open Connection. | ||
| + | * From the drop-down menu select '''SFTP''' (SSH File Transfer Protocol) | ||
| + | * Enter server viperlogin.hpc.hull.ac.uk, Port: 22, Username: University UID, Password: university password | ||
| + | * Click Connect. | ||
| − | |||
| − | + | |} | |
| − | + | {| class="wikitable mw-collapsible" | |
| + | | style="width:100%; background: #aaaaaa;" | <Strong>Uploading Files</Strong> | ||
| + | |- | ||
| + | | | ||
| + | * Click Upload | ||
| + | * Choose the file/folder you want to upload and click Choose. | ||
| + | * The transfer window will appear. | ||
| + | * Please note due to file size the upload may take some time. | ||
| + | |} | ||
| − | + | {| class="wikitable mw-collapsible" | |
| + | | style="width:100%; background: #aaaaaa;" | <Strong>Downloading Files</Strong> | ||
| + | |- | ||
| + | | | ||
| + | * From the file browser right-click on the file/folder to download and select download from the menu. | ||
| + | * The transfer window will appear. | ||
| + | * Please note due to file size the download may take some time. | ||
| + | |} | ||
| − | === | + | ==Linux== |
| − | |||
| − | + | The following example uses FileZilla, you can download FileZilla from https://filezilla-project.org/ (''Windows/Linux and MacOS''). | |
| + | * '''Note''': the FileZilla installer sometimes comes with additional trial software packages. We would advise against installing these | ||
| − | + | {| class="wikitable mw-collapsible" | |
| − | + | | style="width:100%; background: #aaaaaa;" | <Strong>Using FileZilla</Strong> | |
| − | + | |- | |
| + | | | ||
| + | *Enter the Host: viperlogin.hpc.hull.ac.uk, username, password, and port: 22, using an SFTP connection. | ||
| + | [[File:Filezilla_connection_viperlogin.png]] | ||
| − | + | * A pop-up will appear informing that the server host key is unknown. Click Always trust this host and click ok. In the remote site box, your Viper directory will appear. | |
| − | + | * To transfer files click and drag the file/folder from either your pc to Viper (left to right) or from Viper to your pc (right to left). The transfer will start depending on transfer speed and file size this may take some time. | |
| − | + | [[File:Filezilla_transferring_files.jpg]] | |
| − | |||
| − | |||
| − | |||
| − | |||
| − | |||
| − | |||
|} | |} | ||
| − | |||
| − | + | ==Navigation== | |
| − | |||
| − | |||
| − | |||
| − | |||
| − | |||
| − | |||
| − | |||
| − | |||
* [[Main_Page|Home]] | * [[Main_Page|Home]] | ||
| − | * [[Applications|Application support]] | + | * [[Applications|Application support]] |
| − | * [[General|General]] | + | * [[General|General]] * |
| − | * | ||
* [[Programming|Programming support]] | * [[Programming|Programming support]] | ||
| − | |||
| − | |||
Latest revision as of 12:13, 23 September 2024
Contents
Methods
Small to medium amounts of data
This can be carried out using a number of SFTP-styled packages such as sftp, scp, rsync, and Filezilla to name a few. Filezilla can be downloaded as a Windows application and may be more suitable for people who prefer a Windows environment, rather than the command line.
Note FTP (insecure) is disabled on viper.hull.ac.uk and SFTP (secure FTP) is the recommended method.
Large to a huge amount of data (100GB +)
To avoid excessive network congestion and the long period to transfer such data please raise a support ticket for further details. This may typically involve connecting a USB data drive directly to VIPER to copy the data quickly into your user area.
OneDrive to Viper
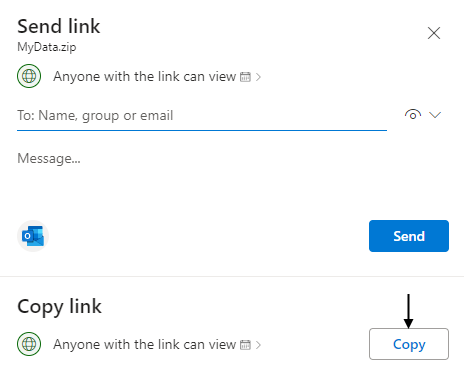
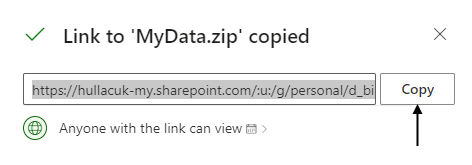
With the University using MS OneDrive, it is possible to copy files to Viper. For multiple files, zip your files up on OneDrive first (considerably easier), as shown here:
| From OneDrive to Viper |
Remember to un-share the file on OneDrive and use unzip (if required) on Linux to restore the file structure. |
Universal
The following can only be performed on Windows after installing MobaXterm or PuTTY.
The example user is user1; you will need to enter your username here:
| * To Viper from local computer |
| scp myfile user1@viperlogin.hpc.hull.ac.uk:myfile |
| rsync -av my-directory viper.hull.ac.uk:/data/users/YourID |
| * From Viper to your local computer |
| scp user1@viperlogin.hpc.hull.ac.uk:bio/YourUCInetID/hpc-file |
| rsync -av viper.hull.ac.uk:/data/users/YourID/mydatadirectory |
Windows
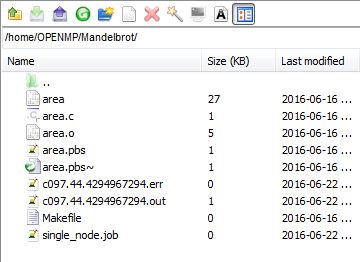
The following example uses MobaXterm, for transferring large files it is recommended to use FileZilla. For instructions on how to use FileZilla view the Linux section. follow the instruction in the Getting Connected section for installing MobaXterm.
| * Uploading Files |
* To upload files to Viper, navigate to the directory you wish to upload files to use the MobaXterm file browser.
|
| * Downloading Files |
* To download files from Viper, navigate to the directory using the MobaXterm file browser.
|
MacOS
The following example uses Cyberduck, you can download Cyberduck from https://cyberduck.io macOS also supports FileZilla for an example of how to use FileZilla please view the Linux section.
| Connecting |
|
| Uploading Files |
|
| Downloading Files |
|
Linux
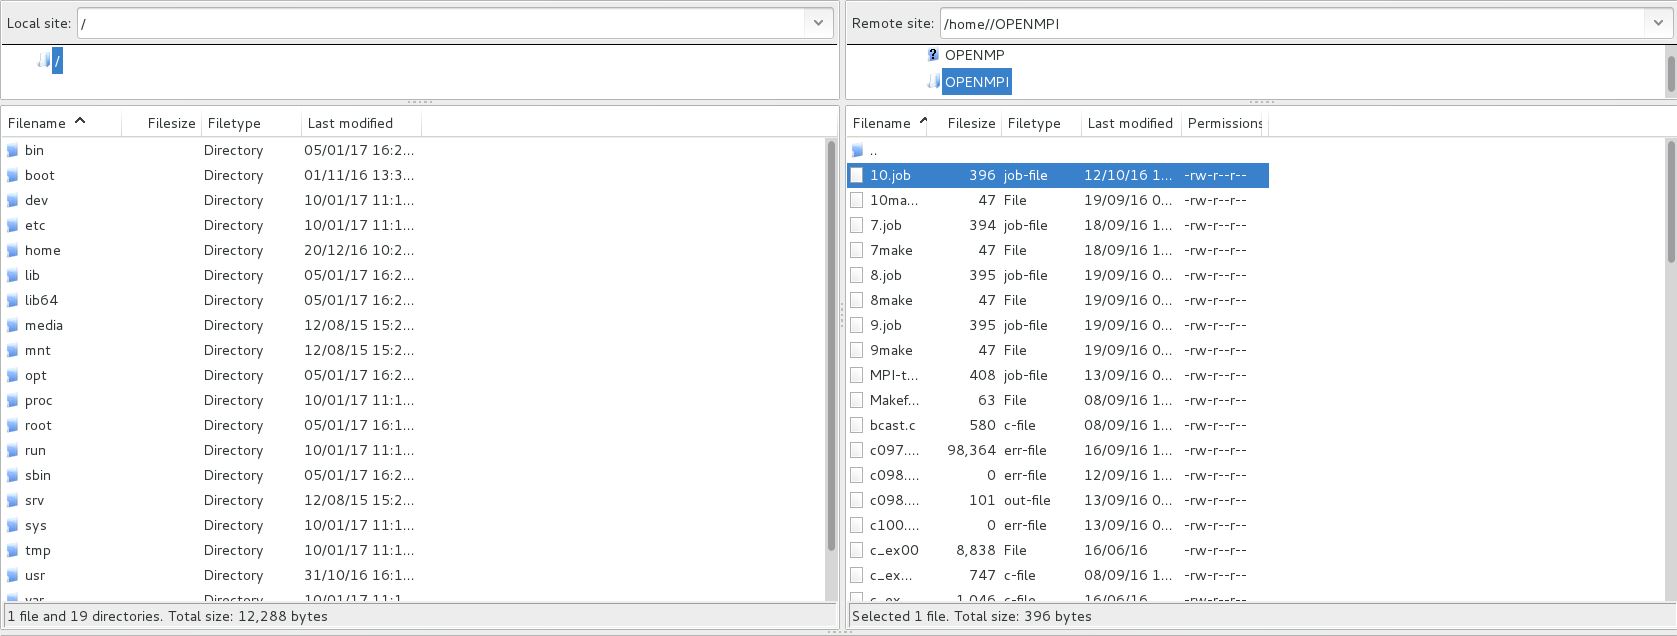
The following example uses FileZilla, you can download FileZilla from https://filezilla-project.org/ (Windows/Linux and MacOS).
- Note: the FileZilla installer sometimes comes with additional trial software packages. We would advise against installing these
| Using FileZilla |
|


